Wednesday, October 10, 2012

Linear Interpolation Calculator

Linear Interpolation
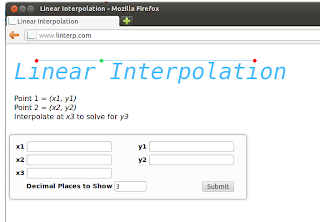
www.linterp.com Home Page


This tiny calculator is an easy way to perform linear interpolation. Once you arrive on the page you can do all of your data entry using the keyboard by using the Tab key to move between entry boxes.

The page is simple and uncluttered and offers a graphical proof of the result. The source is an example of HTML forms feeding variables into Javascript as well as basic use of the flot library (http://www.flotcharts.org/) which is built on top of jQuery. No effort has been made to validate entered values for size or legality.


Results Page

Monday, July 16, 2012

Chaco Plots Using PySide Qt Bindings with Widgets in a QVBoxLayout


This small example builds on the example found at:
http://caethan.wordpress.com/2011/09/05/chaco-plots-in-pyside/

This example can be extended to easily include multiple plots and the adjustment of
plot parameters using spin boxes.

#!/usr/bin/python

import sys
from numpy import *
from PySide.QtCore import *
from PySide.QtGui import *

app = QApplication(sys.argv)

from traits.etsconfig.etsconfig import ETSConfig
ETSConfig.toolkit = "qt4"
from enable.api import Window
from chaco.api import ArrayPlotData, Plot

class Viewer(QMainWindow):
    def __init__(self):
        QMainWindow.__init__(self)
        self.mainWidget = QWidget(self) # dummy widget to contain layout manager
        self.plotview = Plotter(self)
        self.setCentralWidget(self.mainWidget)

        self.amplitudeLabel = QLabel("Amplitude: ")
        self.amplitudeSpinBox = QDoubleSpinBox()
        self.amplitudeSpinBox.setRange(-1000000.00, 1000000.00)
        self.amplitudeSpinBox.setValue(1.00)
 
        self.plotButton = QPushButton("Plot")
        self.plotButton.clicked.connect(self.update) 
                
        self.statusBar().showMessage('Ready to rock!')
        self.setWindowTitle('sin(x)')

        x = arange(100)
        y = zeros(100) 
        self.plotview.update_data(x, y)

        layout = QVBoxLayout(self.mainWidget)
        layout.addWidget(self.amplitudeLabel)
        layout.addWidget(self.amplitudeSpinBox)
        layout.addWidget(self.plotButton)
        layout.addWidget(self.plotview.widget)
        self.setLayout(layout)

     
    def update(self):
        print "Ok"
        print self.amplitudeSpinBox.value()
        x = arange(200)
        y = self.amplitudeSpinBox.value() * sin(x)
        self.plotview.update_data(x, y)
    

class Plotter():
    def __init__(self, parent):
        self.plotdata = ArrayPlotData(x=array([]),  y=array([]))
        self.window = self.create_plot(parent)
        self.widget = self.window.control
        

    def update_data(self, x, y):
        self.plotdata.set_data("x", x)
        self.plotdata.set_data("y", y)

    def create_plot(self, parent):
        plot = Plot(self.plotdata, padding=50, border_visible=True)
        plot.plot(("x", "y"), name="data plot", color="green")
        return Window(parent, -1, component=plot)


if __name__ == "__main__":
    plot = Viewer()
    plot.resize(600, 400)
    plot.show()
    sys.exit(app.exec_())


Sunday, June 3, 2012

golang goroutine Example Sample Code


I don't think basic use of pthreads is that different in complexity from goroutines but it's neat to see lightweight threads as a built-in language feature. goroutine usage superficially looks a lot like costates in Dynamic C, a proprietary nonstandard compiler for the Rabbit series of Z80 derived CPUs from Digi International. It's a really useful feature on a single core 8-bit microcontroller that frees you having "one big loop" with brittle timing in an embedded application.

Code:

package main

import (
"fmt"
"runtime"
"time"
)


func thread1(counter chan int) {
count := 0
for {
fmt.Println("Hello from thread 1")
runtime.Gosched() // force yield
time.Sleep(5 * time.Second)

count++
counter <- count
}
}

func thread2(counter chan int) {
count := 0
for {
 fmt.Println("Hello from thread 2")
 runtime.Gosched() // force yield
 time.Sleep(5 * time.Second)

 count++
 counter <- count
}
}

func main() {
c1 := make(chan int)
c2 := make(chan int)

go thread1(c1)
go thread2(c2)

for {
  count1 := <-c1
  count2 := <-c2
  fmt.Println("main() is alive ", count1, count2)
   time.Sleep(5 * time.Second)
 runtime.Gosched() // force yield
}
}

Output:

Hello from thread 1
Hello from thread 2
Hello from thread 1
Hello from thread 2
main() is alive  1 1
Hello from thread 2
Hello from thread 1
main() is alive  2 2
main() is alive  3 3
Hello from thread 2
Hello from thread 1
main() is alive  4 4
Hello from thread 2
Hello from thread 1
main() is alive  5 5
Hello from thread 2
Hello from thread 1
main() is alive  6 6
Hello from thread 1
Hello from thread 2


Tour golang Exercise: Maps #45 WordCount Solution


This exercise from the golang tour asks for a function that will count the number of times each word appears in a string. I think of it as using a hash to contain a histogram of word frequency. The if/else could be tighter if go had a ternary operator.


Code:


package main

import "strings"
import "fmt"

func WordCount (s string) map[string]int {

    substrs := strings.Fields(s)
    fmt.Println(substrs)

    // key,value  ==> word,count
    // iterate over substrs, if key in map, value++, else create

    counts := make(map[string]int)

    for _, word := range substrs {
        _, ok := counts[word]

        if ok == true {
          counts[word] += 1
        } else {
          counts[word] = 1
        }
    }

    return counts
}

func main() {
  fmt.Println(WordCount("now is the now is the go go go it a a a a a"))
  fmt.Println(WordCount("1 2 3 11 22 33 1 2 3"))
}

Output:

[now is the now is the go go go it a a a a a]
map[now:2 the:2 go:3 a:5 is:2 it:1]
[1 2 3 11 22 33 1 2 3]
map[2:2 33:1 1:2 11:1 22:1 3:2]

Common Error:

./wordcount2.go:20: cannot convert true to type int
./wordcount2.go:20: invalid operation: ok == true (mismatched types int and bool)

This occurs when attempting: 

    ok := counts[word]

Instead of:
    
    _, ok := counts[word]

Monday, May 28, 2012

How to Drill a Hole in a Golf Ball Perfectly

1935 South Bend Heavy 9x48

Holding a golf ball for drilling is pretty difficult with common tools. The ball wants to pop out of clamps and vises. One quick and dirty solution is to drill a hole smaller than the diameter of the ball in a board and hold the ball in place using the board and your foot.

You can also build a small box to easily hold a ball for drilling at the bench vise or drill press using this concept. If you are able to hit the center of the portion of the ball exposed by the hole you will get a decent hole.

But if you want a perfectly balanced ball, you want a dead center hole. And the easiest way to drill a dead center hole is hold the ball in a three jaw chuck in a lathe. I cranked down pretty tightly on the chuck and the ball still wanted to pull out of the jaws unless the lathe was in reverse when withdrawing the drill bit. There just isn't very much contact surface.

Be sure to get solid core balls for safety, liquid core balls can eject liquid under high pressure.


Tuesday, May 22, 2012

Parse XML with Nokogiri then remove tags

Galloping Ghost of the Japanese Coast


Let's say you have an XML document containing authors.

The Nokogiri tutorial tells you can do this:

   authors = doc.xpath("//author")

And it shows you will get output like this:

   <author>Kernighan</author>
   <author>Ritchie</author>
   <author>Matsumoto</author>

How do you get rid of all those tags?

Instead of reading the Nokogiri documentation like I should have, I tried to further process this output.

A regex worked fine but you have to worry about exceptions if there are no matches. And it's ugly.

doc = Nokogiri::XML(body)

auths = []
authors = doc.xpath("//author")

for i in 0..authors.length - 1
  auths[i] = /.*<author>(.*)<\/author>.*/.match(author[i].to_s)[1]
end

I also tried string substitution, which also worked fine. I didn't test a no match case.

doc = Nokogiri::XML(body)

auths = []
authors = doc.xpath("//author")

for i in 0..authors.length - 1
  auths[i] = author[i].to_s.sub("<author>","").sub("</author>","")
end

I knew I was parsing already parsed data and thought there should be an option to suppress the tags. I received some good advice to look more closely at Nokogiri and I came up with this approach of popping Nodes off of the NodeSet.

If you need know how many Nodes there were originally you have to save a copy before the first pop.

doc = Nokogiri::XML(body)

auths = []
authors = doc.xpath("//author")    

while authors.length() > 0
  auths << authors.pop().inner_text()
end

I think there might be an approach where you can iterate over the NodeSet without worrying about length and without using pop() but I haven't figured it out yet.

Sunday, February 12, 2012

Precise Installation of a Drawer Knob on a Shaker Style Drawer Front in 6 Steps


Step 1 - Set a machinist adjustable parallel to half the vertical height: 1 1/4".


Step 2 - Use the parallel to mark the horizontal center line.


Step 3 - Use a machinist's 6" scale to mark the vertical center line.


Step 4 - Use an awl to make a center punch mark.


Step 5 - Use a brad point drill and a power drill to drill a clearance hole.
Cover the drill fixture will masking tape to protect the finish.


Step 6 - Install knob. Repeat N times.


NOTE - The drill fixture shown is a PORTALIGN from Sears. These have not been made in decades. It really creates a terrific portable drill press. All of the adjustable products that available today that look similar are complete junk. Taking off the drill chuck is pretty difficult so this Sears industrial 3/8" drill made by DeWalt is dedicated to the PORTALIGN.

Monday, January 2, 2012

Word autocorrect can be a lot like emacs abbrev-mode


Tired of typing the same stock phrases over and over again in Word? You can use a stand-in word and global search and replace when your document is finished but it's a lot more fun to watch Word automatically type for you.

For example, if you add an entry to your autocorrect dictionary as shown above, every time you type the key qnato, Word will instantly replace it with North American Treaty Organization just like emacs abbrev-mode.

If you have different groups of abbreviations for different kinds of writing you can prefix them all with the same letter or number and they will stay grouped and separate in the Word autocorrect dictionary.

Some general ideas for using this would be:

   @gg = @gmail.com
   @yy = @yahoo.com
   @me = your.name@bigcorp.com

You can also highlight an entire block of text and the entire block including all formatting can be assigned to an autocorrect  key. This would be useful for having various signature blocks, addresses and boilerplate sentences and paragraphs for business letters.

And the last thing you can do is select a photo or picture in a Word document and add an autocorrect key for it. For example if you paste a picture of The Dude into your document and add the key dude for it, every time you type dude, a picture of The Dude will be inserted.

Teachers can use this for easy clip art insertion. Any bit of art that is regularly being inserted into your documents can be assigned to a key.

You can build a dictionary with an image for every number and letter if you want for puzzle construction.

If it turns out that this a seldom used feature of autocorrect I would worry about normal.dot corruption if the images are large, especially since the art is probably stored in normal.dot.

Sunday, January 1, 2012

Samsung SyncMaster 204B Power Supply Repair

Samsung SyncMaster 204B PSU PCB


The SyncMaster 204B is a very nice 20.1" UXGA (1600x1200) panel circa 2006.
I really like this aspect ratio but everything has gone widescreen and a monitor like this is basically no longer available.

The CapXon caps bulge and fail and before complete failure the monitor flickers more and more since the caps are on the switching power supply that powers the backlights. I think only the three caps after the chopper were bulging on this unit.

See: http://en.wikipedia.org/wiki/Capacitor_plague

Opening the monitor is a PITA and you don't want to do it twice so replace all the caps the first time. Use flush cutting side cutters to cut away as much of the leads and solder as you can. Solder wick rubbed with flux and pressed into what remains will loosen the caps to the extent that they will almost fall off the PCB.

More info:

http://tinymicros.com/wiki/Samsung_SyncMaster_204B_LCD_Repair

A proper parts list is a stumbling block for some people. These parts are perfect for my board rev 0.1 as of December 2011. These are not the cheapest possible parts but the parts with the longest lifetime ratings.

Digi-key part numbers